|
||||
QSI DCC Decoder Installation with Sound into a Bachmann F(G)n3 2-Truck Shay A QSI G-Scale decoder with sound was used for this installation. Bachmann is building their models to 20.3:1; which is correct for narrow gauge on Gauge 1 Track. It has been dubbed Fn3.
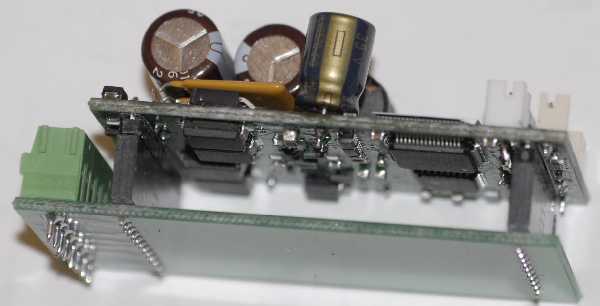
A model Shay, a sound system, and DCC - except for the real thing, it doesn't get any better than this! At the end of this installation write-up, I have listed several US locations where I have seen operating Shays. If you are not familar with Shays and bought yours because it looks unique, be sure to read the section also at the end on why Shays really are unique. About the Bachmann 2-Truck Shay There are at least two versions of the Bachmann 2-Truck Shay. The current version of the Shay is DCC ready. It has a circuit board with screw terminals in the tender. It also comes with two schematics - one labeled DC and the other DCC. It does not come with an instructional video for lubrication. The original Bachmann 2-Truck Shay was not DCC ready. It comes with a instructional video for lubrication. It obviously does not come with a schematic labeled DCC. If you have the older Bachmann 2-Truck Shay, go to my installation notes on original Bachmann 2-Truck Shay. The tender has a circuit board that occupies the middle of the tender cavity. Because of this circuit board, there really isn't much room inside the tender cavity. If you want sound - and who doesn't - I suggest you use an decoder with integrated sound rather than separate sound and decoder modules. If you did successfully use a separate sound module, please writeme and let me know what you used. I will update these installation notes. About the DCC Ready Shay The schematics that come with your new Shay are intimidating. Where does one start? The table on the lower left corner of the DC schematic is actually all you need and installation is very simple. I will walk you through it step-by-step below. Installation is so simple that the only solder connections that you will need to make are to your speaker terminals. There is also an error on the DCC schematic. It doesn't really affect you since you are following my instructions. But just so you know, the brown wire leaving the decoder goes to a black wire on the Bachmann circuit board. The black wire leaving the decoder goes to a brown wire on the Bachmann circuit board. There is one big goof on Bachmann's part. They route the wires for the rear truck right through the middle of where the speaker goes. If you screw down a speaker, the speaker cone touches the wiring. As I was afraid, this causes severe sound distortion. I solved the problem by making adapter rings described below. About the QSI Sound Decoder Module At the recommendation of Tony from Tony's Train Exchange, I used the brand-new QSI 670-0253-01. The sound decoder was for a 2-8-0. Since the sound decoder accepts the Shay's chuff contacts, the chuffing sounds correct. You can also program the sounds using the QSI programmer.
In order to make the adapter circuit board as short as possible, you will find that you cannot read the markings on the adapter. Again, have no fear, I have numbered the terminals on my schematic starting from the left on the adapter screw terminals. There is a small error on the decoder schematic. You will find the terminals on the adapter board are labeled in a different order than shown on the schematic. The labeling for the front and rear headlight are reversed on the schematic. If you follow my instructions, you locomotive will move in the correct direction as commanded by your throttle and your front and rear lights will also work properly. This decoder, without an additional adapter, does not support any lighting functions such as cab light or driving the smoke unit.
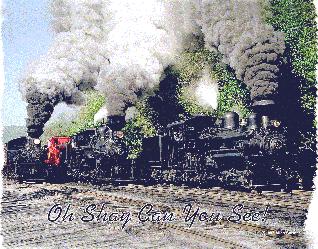
All Shay photos taken by Allan Gartner. The two photos appearing in these installation instructions were taken by myself and are available as placemats or laminated pictures that you can hang on your wall.
BEFORE YOU START This installation note assumes you have read the section on Sound and the section on Wiring Specific Locomotives.
HANDLING YOUR LOCOMOTIVE Murphy's Law usually ensures that I damage something. This is a well built locomotive, but it is heavy too. If it slips out of your hand, something may end up pulling tight on a wire and breaking something. Always handle by frame and running boards when turning locomotive over. Also keep away from non-train oriented relatives. They are not aware that this plastic-sheathed model is full of metal and TOP heavy. Perhaps install one of those people sensitive car alarm systems that says, "STAND BACK! PROTECTED BY VIPER!" DO work on your Shay on foam as suggested. But use a piece of foam that is at least 20" wide and keep the Shay AT LEAST 10" from the edge. If you are going to sneeze, lay the Shay down FIRST! Due to it's top heaviness, the Shay is not stable standing up on the foam. Working on the Shay upside down is not a good idea. The exhaust pipe on the dynamo is extremely delicate and sticks above the cab. If you want, go ahead and break it off now and get it over with. (Admit it. The idea appeals to you.) While you are at it, you may want to break the whistle off, too. If you are going to work on it upside down, it is probably doomed as well. |
| I knew routing out the middle would be difficult to make look good. What I should have done was routed out a rough hole and then used a grinder bit in my Dremel to make a nice round hole. | 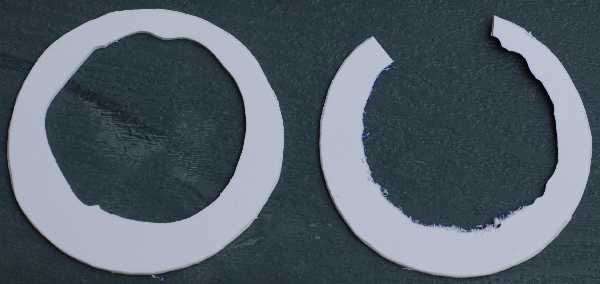 |
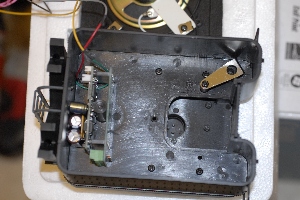
Cut a gap in one of the rings. This will be your bottom ring. The gap will form a channel through which you can route the wires.
Leave one ring whole. This will be your top ring. It will hold the wires down and prevent them from touching the speaker cone. That's all there is to solving Bachmann's speaker goof.
This Shay takes a 3" speaker. Radio Shack does not sell a 3" speaker and neither does Tony's. What to do? What to do. Tony's does sell a 2.75" speaker. I like a good challenge. So I decided to see if I could make a 2.75" speaker fit. As it turned out, it wasn't much of a challenge. It was a pretty easy thing to do. Just cut a piece of thick styrene in the shape as shown in the photo and drill a hole in it for the mounting screw. Note the angle cut on the styrene strip. This is so the strip does not interfere with the hold down screw for the Bachmann circuit board. Tighten the mounting screw so that the styrene clamps down on the speaker over the speaker terminals. Clamp down on the speaker with the hold down clamp in the Shay on the opposite side of the speaker from the styrene strip. |
|
2.75" speaker held down by styrene strip. Note angled cut on strip. This is so the strip doesn't interfere with the circuit board support that screws down in the hole to the right. Also note the orange and green wire coming out from under speaker near upper left. This interferes with speaker cone movement. This photo was taken without spacer rings so that you could more readily see the hold down strip. |
![]()
So not only was the terrain too torturous for a standard rod driven locomotive, there was also no nicely graded and ballasted roadbed and trackwork.
The first order of business is to get rid of the rigidly mounted drivers of a standard rod driven locomotive. Compared to a rod drive locomotive, gear driven locomotives can turn on a dime. You can readily take advantage of this in your garden where there may not be enough room fo large radii.
The spline and universal joints of the powertrain allows every wheel to help move the locomotive through the rugged terrain. You can take advantage of this by employing steeper grades where you don't have room for a more gradual rise. Where a typical locomotive has a limit of about 4% grade, a Shay can climb 10% up to 14%.
There's no place for speed in rugged mountains with heavily log laden cars. So the gearing and small drive wheels trades the speed of a rod driven locomotive for tremendous torque. It can get up to any speed it wants to in relatively little time. Of course that speed is only about 4 to 12 mph!
So the long drawn out chuff of a rod driven locomotive is replaced by rapid staccoto bursts of steam and a flurry of activity by the pistons as this locomotive goes nowhere fast. As you lounge and enjoy a leisurely time in your garden, let your Shay do likewise and run it slow. While the train progesses at a snails pace, you will be rewarded by the sights and sounds of busy pistons.
A rod driven locomotive has the pistons on each side for balance. While the Shay needs to be balanced, too, putting a drive train like it has on both sides would do little except complicate things greatly. So the pistons are on the right side and the boiler is offset to the left to provide balance.
Having no driving mechanisms on the left makes it effortless to get under the locomotive to do servicing. Also notice that there is almost nothing underneath to service. Try to get under a rod driven locomotive without a pit! Lastly, all the driving mechanisms are convienently exposed on the right side. None of this is any accident. What if it breaks down up on a mountainside? Even back at the base camp, there were no lavish engine servicing facilities - after all, it was a temporary location appropriately called a camp.
It was undesirable to waste the time and effort to put up temporary water tanks on these precarious mountainsides. Besides, just think of moving a large wooden tank and expecting it told water after you were through! Hence, the Shay is equipted with a steam powered siphon to suck water out a mountain stream. That's represented by the piece of modern day tubing Bachmann supplied with the Shay. You should see this thing work! It's been a few years since I've been to Cass. Hopefully, they still have the old tank car they cut a big hole in and sank it into a small mountain creek. They drop the siphon hose into the flooded tank car and proceed to suck it empty in the next few minutes. I suspect small mountain streams were dammed up with tree branches they had no intention of taking to the saw mill.
You have an interesting challenge in laying your trackwork. You might think that you have a good opportunity to lay sloppy looking trackwork. After all, that would be prototypical! But your trackwork will probably be down many more years than the prototype. So your challenge is to lay it down well while at the same make it look bad.
Shays came in both narrow gauge and standard gauge, had two or three cylinders, and had typically two or three trucks. In the case of the third truck, the tender portion was moved to this truck allowing both the tender and the boiler to be bigger.
Some US locations where operating Shays can be found:
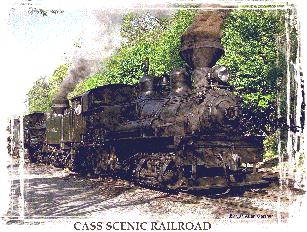
Cass Scenic Railroad, Cass, WVa - The place to go for geared locomotives in the eastern US. About 90 minutes off the Interstate from Roanoke, Va. Ask about the railfan weekends. 1-800-CALL WVA. OCCASSIONALLY a washout in early spring affects their operating schedule. This is a real mountain logging railroad! You might want give them a call to be sure everything is fine. Stop by in Roanoke to see N&W 611 at the Virgina Transportation Museum.
North Carolina Transportation Mueseum at Historic Spencer Shops, Spencer, NC. See their newly restored roundhouse. Call to find out when the Shay is being run.
Big Trees and Roaring Camp, Santa Cruz, CA. Several Shays and occassionally a Heisler through a redwood forest. Has a operating steam donkey powered sawmill and a few other things for the family.
Yosemite Sugarpine Railroad, SSW of Yoesemite National Park, CA. A former logging railroad on the outskirts of this great park.
![]()
Copyright by Allan Gartner 1996 - 2007 © All rights reserved. You may print this for your own, personal, non-commercial use. Noncommercial, non-personal reproduction may be requested by visiting www.WiringForDCC.com/writeme.htm . All users, commercial and non-commercial, may link only to this site at www.WiringForDCC.com. Thanks to all who contribute to this site and the Q&A forum! |