|
||||
Decoder Installation into an Rivarossi HO Big Boy 4-8-8-4
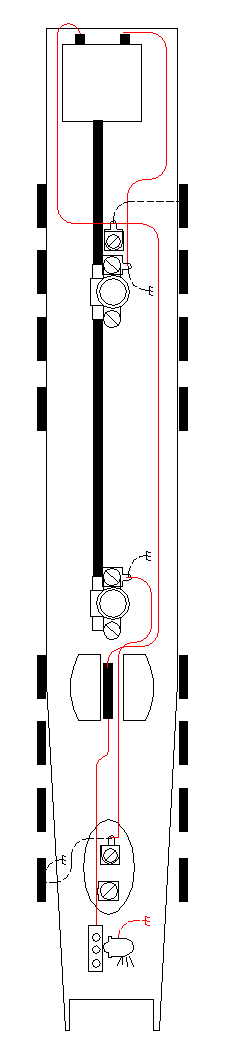
Big Boy Factory Wiring Not exactly to Scale! Current draw of factory headlight: 33mA @ 12V. For your information, I used a DH83FX decoder for this installation. Initially, the most challenging thing about the conversion is figuring out how to get the locomotive apart. See the parts diagram that came with your locomotive on how this is done. See the section on openning the Centipede Tender w/o a jack-hammer, radial arm saw, nut cracker, or whack-a-mole mallet if you wish to use a rear head light. Before removing any wires, note the two solder terminals in the front of the locomotive behind the head light inside the oval shown below. The wire going to the front terminal is not actually attached to it. Careful examination will reveal that the terminal is folded over the wire simply holding it in place. You may leave this in place. Look at the drawing below. The two wires shown in red are the only two you will leave in the locomotive. Remove all the other wires shown in the above drawing. Fortunately, the motor is already electrically isolated from the frame - once the wires are removed from it, of course. Unfortunately, like many steam locomotives, the head light is grounded to the locomotive's frame. You may use the headlight at half brightness if you simply ignore the next few paragraphs and skip trying to attach the blue wire. To use the head light fully from the decoder, you will need to isolate the bulb from the frame. After hours of thought, this seemed like the best way: If you don't have a grain of wheat bulb handy, follow these directions: Remove the bulb. To remove the bulb, you will need to remove the metal contact holding the bulb in. In so doing, you should remove the pilot, the front walkway, the head light, whatever that part of the locomotive is called. Make sure you do this! Or else you may be ill if the next step doesn't go well! You should be able to see all the way through the head light mount. Get a drill bit that is barely bigger than the hole. With the locomotive turned upside down, say a prayer, close your eyes if you want, and drill. If you are careful, you will only have drilled the metal and not all the way through. I managed to take a chip out of the light housing. Fortunately, the light housing is not visible. Then get the next biggest drill bit and repeat - including the prayer and the optional closing of the eyes. Do this one more time. I hit the plastic housing again. If anyone has a better way of dealing with problem, please tell me and I will pass it along. If you do have a grain of wheat bulb, follow these directions: Use the metal tab holding the orginal bulb to hold in the new bulb. Put a piece of heat shrink over it or electrical tape around it - it will keep the metal tab from rubbing through the wiring of the grain of wheat bulb. You no longer need to have any wires going to this metal tab. You will simply use it to hold the grain of wheat bulb in. Solder the wires from the grain of wheat bulb to the white and blue wires coming from the decoder. Obviously, using a grain of wheat bulb is much easier than the above!
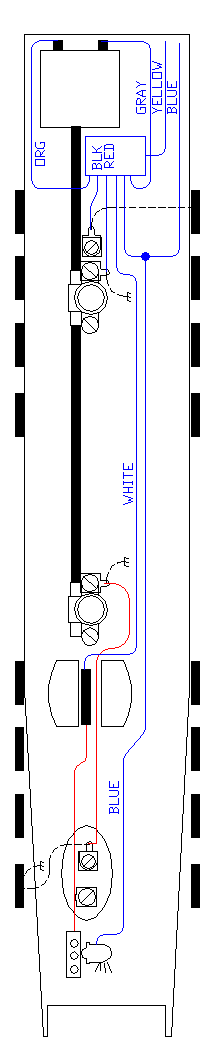
Install the decoder wired as shown. The gray and orange wire go to the motor as shown with the solder terminals pointing down. The red decoder wire goes to the wire terminal that has a plastic piece around it. Be sure to remove the terminal before soldering to it! If you don't, you will melt it and you will probably short out your locomotive, damage your decoder, and otherwise ruin your day. The black wire goes to the terminal on the worm gear head driving the rear set of drivers. Again, remove the terminal and solder the wire to it. The original wire from the head light goes inside a black "thing" wedged into the front weight. I took it apart (I couldn't resist.) and it is nothing more than a connector. You may keep it or omit it. Due to the mass of metal in this connector, if you keep it, you will find it hard to solder to. If you keep it, be sure you have a good solder connection. See the section on solder tips in this web page. Don't forget to slide a sleeve of heat shrink over the wire before you solder! Using one of the wires you cut off the decoder, solder to the side of the head light with the wire leaving the bulb to the bulb's rear - as opposed sideways or towards the front. Then get a piece of 1/4" or so heat shrink tubing. Cut three short slits in it on one end. Then slide the tubing over the front of the head light allowing it to flare a bit when reaching the back of the bulb. This is easier said than done. You may have to "help" it. Then with a sharp knife, cut the tubing so that the glass part of the bulb is exposed. Count your fingers and ensure none are bleeding. When you reattach the metal strip that presses on the bottom of the headlight, be sure to put the plastic washer back in. Make sure the metal tab rests on the plastic pilot truck, not the metal of the body. You will have a short if you do not put it back together exactly as it was before you took it apart. Run the yellow wire and an extension of the blue wire through the hole and out the back of the locomotive. For futher instructions on the rear tender headlight, like how to get into it, click here. Take all the decoder wires you have left over and cut the ends off of them so that there is no exposed wire. Put all of them inside a piece of heat shrink and shrink it. Do not solder them together! While cutting them flush almost guarantees that they will never short to anything, especially the frame (which is tied to one of the wire pick ups), almost doesn't count. You need a guarantee. If no heat shrink, then electrical tape - though electrical tape leaves a messy residue. If you are still thinking about not covering these ends, think of these two things: How much is that piece of heat shrink tubing worth? How much is a decoder worth? |
Copyright by Allan Gartner 1996 - 2006 © All rights reserved. You may print this for your own, personal, non-commercial use. Non-commercial, non-personal reproduction may be requested by visiting www.WiringForDCC.com/writeme.htm . All users, commercial and non-commercial, may link only to this site at www.WiringForDCC.com. Thanks to all who contribute to this site and the Q&A forum! |