|
||||
Decoder and Soundtraxx Sierra Sound Installation into a Bachmann Fn3 (G) External Frame Consolidation
This installation note assumes you have read the section on Wiring Specific Locomotives, the section on Sound, and the section DCC in the Garden.
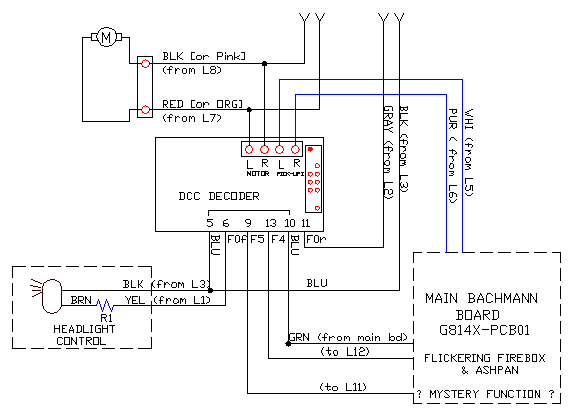
DCC Ready??? (A few jokes and pokes.) This locomotive is "DCC Ready." Note that it does not say "DCC Plug and Play" or "DCC Ready andWilling." This means it is more DCC ready than say, their original Shay or your cat's water dish. As far as DCC is concerned, there are a few challenges that await and could confuse you. Luckily, I got through it for you. Most of the mysteries are resolved here. Some of the challenges and mysteries are: 1. Why are the wires too short to come out of the boiler to attach the decoder. Perhaps not as important, but even more puzzling, is how did they wire it in the first place?!? 2. The wire colors on the diagrams don't match what's in the locomotive. Bachmann told me they may use whatever they had. Forget any thoughts of the NMRA DCC color standards of being used! 3. The schematic is drawn as an impossible to read, three-dimensional drawing that doesn't have the pin numbers labeled. Even Bachmann's expert couldn't tell me what terminals the wires should go to. I risked smoking my decoder and locomotive so that you could have this write-up! (And, yes, so I could have a locomotive with DCC.) 4. There are two functions controlled by the decoder as shown on the Bachmann drawing. Even Bachmann's expert could not tell me what the second function is. This is the only mystery I couldn't resolve. I show it wired up anyway. Maybe it controls the smoke; which I don't use. All I can say is, whatever it is, I hooked it up right! (Is that confidence or what?!?!) 5. How do you use a decoder other than the Lenz that is shown? I had a Zimo. (Note: I understand Lenz has a new, higher current decoder I would have loved to try if I didn't already have the Zimo.) 6. How do you put sound in it? Follow your sound manufacturer's instructions? How often have you seen sound instructions that told you where things were inside a specific manufacturer's locomotive? 7. Is the common wire that controls the functions a ground or a typical DCC postive "blue wire" common - never mind the wire is green? Okay, enough fun at Bachmann's expense. Perhaps a bigger mystery is the answer I got from another manufacturer who asked me what I wanted. I said I wanted an external frame locomotive. They said their was no market for it. Say what??? There is no market for the ultimate narrow gauge locomotive? Everyone seems to be buying this thing. I won't say what their name is, but their initials are LGB. Laugh, Ron, Bachmann is. Okay, that's enough jokes. We are fortunate to have both of these manufacturers. I'll get you through the documentation issues. Except for the wires being too short, you won't have any trouble putting a decoder and sound in this locomotive. Supposedly, the flickering firebox and ashpan are separate functions. They are not. They are both controlled by the same DCC function output.
Is This Locomotive Big or What? If you haven't bought one of these yet, you better realize that this is essentially a standard gauge locomotive with it's wheels reworked for narrow gauge track - hence the external frame. This will, by far, be the biggest locomotive you have. All those bridges and tunnels you didn't bother to make to scale and seemed to big, you will find will barely let this locomotive through. Whooooooooooeeeeeeeeee!!!! The first time we ran this locomotive around my three tracks, the clearances in some cases were less than 1/8" (3mm). Yikes! It was close. There was one bridge that launched the front of the locomotive skyward. Okay, one more joke. Who do you think made that bridge? Bachmann! So take the sides off that plastic A-frame. This locomotive has no prayer of making it through this bridge. At least I wasn't the only one who didn't plan for an external frame locomotive! Make no mistake about it. None of this is Bachmann's fault. In fact, if you buy any supposedly to scale external frame locomotive, expect to have the same problem. This is simply the result of turning a standard gauge locomotive into a narrow gauge one. If this wasn't done, we wouldn't have those cool weights swinging around where the wheels should be. What was that? Where the wheels should be??? This turns out to be another interesting difference of an external frame locomotive. You will find that you can't put it on the track like you are used to. In fact, you will notice that you can barely see the wheels! If you are used to feeling for the wheels and putting a locomotive on the track, you find this one difficult to rail. Perhaps after you learn to feel past the weights and make sure you really are touching the wheels, it will get easy again. Some people are getting one of those plastic railers that you roll the locomotive down onto the track. Whatever technique you use, don't try putting this locomotive on the track at dusk without a good light until you have a good system for putting it on the track. My advice: leave it on the track! Coupler Height: Okay, this will probably be a problem for you, but again, it's not Bachmann's fault. Most G-scale cars, to negotiate sharp turns, have their couplers mounted on their wheel sets - too low! Bachmann body mounted their coupler making it too high for all my rolling stock. Maybe the only thing Bachmann should be criticized for is not providing an adapater to get you down to the typical G-scale coupler height. We had to make an adapter out of pieces of wood. I have a sharp turn going into my garage. Body mounting is not an option for me. All this will help make this one of the most interesting locomotives in your garden. So let's get a decoder in it!
Decoder Selection This generic installation instructions can be used with any decoder made by any manufacturer of your choosing. See Decoder Selection in the DCC in the Garden section.
Wiring the Locomotive: The colors of the wires that come out of the decoder on my schematic are the NMRA standard colors. Be clear on that. All the other wire colors are those of the Bachmann locomotive itself. There is one thing I must emphasize on the Bachmann wire colors. The locomotive does not follow what is on their schematic. Which means the colors I have shown for the Bachmann locomotive may be wrong as well. Note where I have Black or Orange. One of those is what is on the schematic. The other was what I found in my locomotive. Yours may be different still! The pin numbers are for the Zimo decoder. Note, I do not show the wires going to the ribbon cable connector on the drawing. I did this simply because things would be too cramped making the drawing too difficult to read. I have drawn a Zimo decoder which does not have NMRA colored wires. So for the motor and power pick up, I have shown the screw terminal block that the Zimo MX66S has. The wires shown with the numbers are the numbers of the wires on the ribbon cable connector that the Zimo has. As manufacturers have put more and more electronics, like flickering fireboxes, into their locomotives and are doing a better job of making them DCC ready, it becomes somewhat challenging of how to best draw up for you what you need to do. For example, you will notice that the drawing of the main locomotive does not show the wheels. (Only the tender drawing with the sound shows the wheels.) So I showed the L number of the connector shown on the Bachmann schematic, the color specified on the schematic, and where the wire came from that is connecting to your DCC decoder. I sincerely hope that this is clear. Let me give an example to help ensure clarity. The power pick up leads are wires that are attached to the main Bachmann board, the G814X-PCB01. They are also, as delivered by Bachmann, attached to L5 and L6. Hence my drawing says "from L5" or "from L6". Remove these wires from L5 and L6 and hook them up to the left and right wheel pick-up inputs on your decoder The same applies to most of the others. In some cases , the wires disappear into the boiler and you can't really see where the other end goes. L11 and L12 didn't have anything connected to them. The function output you connect to L12 will control the firebox and ashpan. I have verified that the input circuit on L11 is the same as L12, but I didn't find anything controlled by it. (It might be the smoke which I don't use.)
Now that you know where the wires go, there is the matter of hooking up the wires. As I indicated earlier, some of the wires in the locomotive are too short. That is, they are not long enough to pull the end out of the boiler - to either connect to a decoder or solder additional wire to. This is definitely a problem Bachmann should fix if they are going to call this locomotive DCC ready. I was unable, with my big fingers, to reach inside the boiler and twist a wire to the wire I wanted to add. The best I could do was put a blob of solder on a wire, reach inside the boiler with the wire and a hot soldering iron tip and solder the ends together. Then I slid some heat shrink over the wire (depending on the decoder you use, you may need to put the heat shrink on first.) Then I took my grill lighter and reached inside the boiler to shrink the tubing. Doing this didn't make me happy, but it is doable. (I could have used my hot air gun, but not all of you have them. I wanted to see if it could be done with a grill lighter. Yes, it can.) The Zimo decoder fits nicely in front of the circuit board. While that seems like a good idea, look at the back of the cover to the smoke box. There are switches there and you won't get the cover back on if you put the decoder here. Scratch that idea! I had to sit my decoder on top of the Bachmann circuit board. The Zimo has an insulating bottom so that worked just fine. If your decoder is not insulated, you will need to make sure that it is or you will "let the smoke out" of either the decoder and/or the main circuit board. You will be very unhappy with yourself! I left several inches of extra wire so my decoder would be easy to hook up. In putting the locomotive back together, I noticed a notch under the smoke unit that the wires to the smoke box cover could go through. So I had to run my wiring around the smoke unit. If you use your smoke unit, you could risk melting your wiring. I suggest you make your wiring about 4-5" inches past the front of the smoke box so that you can comfortably run the wiring under the circuit boards and take advantage of the slot Bachmann provided.
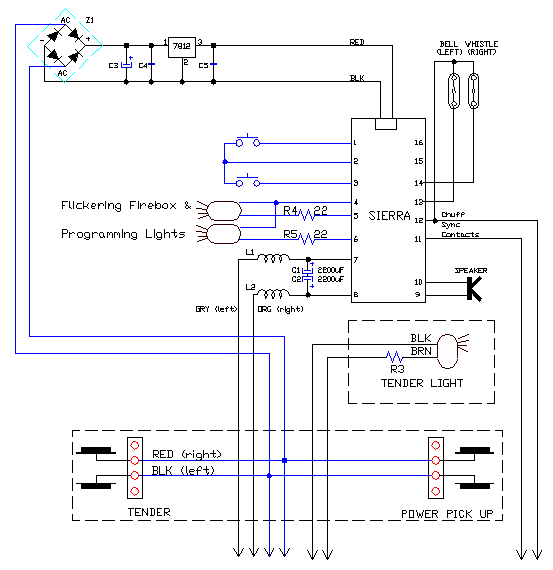
Wiring the Tender for Sound: The tender proves that the folks at Bachmann do have a sense of humor. They did not specifically provide a place for you to pick up wheel power, like they have previously, and they hide the chuff-sync circuit board (under the right front of the tender), mounted it upside down, and to top it all off, they used red and black each twice - for two different purposes! So pay attention closely! You will find a red and a black going to the rear headlight. Note which screw terminals these are and disconnect the rear headlight to get the top half of the tender out of your way. Make sure you know which ones these are and don't forget it! Build my power supply circuit for the Sierra. Solder the wires from the bridge rectifier, Z1, to the other red and black wires that you follow down to the wheels. While Bachmann did not provide terminals for you to run your sound system, the brass lugs for the wheel wiring serve the purpose. Make sure you unscrew a brass lug from the plastic body or you will melt your tender screw mounts trying to attach the wire! I suggest you only remove one brass lug at a time and leave the others mounted on the tender. This will help prevent you from getting confused about where things go back. It doesn't matter which wire goes to which wheel from the sound unit circuit I have shown. Take the cover off the right front of tender connector. Remove the circuit board and solder your chuff sync wires to it. Again, it doesn't matter which wire goes to which point on the circuit board as long as each goes to the connector Bachmann provided. Voltage Controlled Functions: Note: The Bachmann locomotive does not provide the motor leads in the tender. This means you cannot sense the motor voltage and polarity with the Sierra without running your own wiring. Interesting, one of the circuit boards in the tender has two unused traces where they could have very easily used a four pin connector. Bachmann, please do next time. Modelers will love you for it! Without running extra wires and adding your own connector,
what do you loose? At first, I was thinking not much and was going
to forego running the extra wires. But after some carefull thought,
you do loose a lot and I decided to run the extra wires. Here's
what being able to sense the motor voltage gets you: I obviously pass on the last three, but I can see where many of you might want this. If I just lost one of the first two, I might not have run the wires, but loosing both was more than I could stand. I had to run the extra wire and connector. Running the connector isn't so bad, but getting the wires to the decoder or motor seemed masochistic. Either Murphy gave me the day off, I was very lucky, or just darn good at what I do, but it surprisingly easy. For your sake, you had better hope the latter, because if it was luck or Murphy bothering someone else that day, this will be very difficult to do. So here's how I did it. Hopefully, it will go smoothly for you, too. 1. Solder two wires together, side-by-side, forming a point. Trim the point so that it is bumpy. Make the point somewhat rounded. A sharp point may dig into someting inside the locomotive. DO NOT do this any other way! You must solder them. This important arrangement will be snagged by a hook in a few steps. 2. Remove the four ashpan screws. 3. Take a deep breath, say a lot of prayers, cross your fingers and toes, and then fish the soldered wires upward into the locomotive. 4. With a coat hanger, or a long piece of #14, 12, or 10 wire, make a hook. 5. Shine a flashlight into the boiler - a small penlight type will allow you to see straight into the boiler (a large one will be in the way.) This is where the luck, Murphy, or the just plain good part comes in. Hopefully, you will see your soldered wires appear at the very back of the boiler. If you do, stop what you are doing and invite your friends over. They might not be impressed, but you will feel like celebrating and they won't complain about the free beer. 6. With your hook, snag the solder joint and pull it out the front of the locomotive. 7. Cut the solder joint off. Connect the wires to the decoder motor wires. While I was expecting a lot of trouble, this really did go well and was all done in a matter of minutes. I spent a lot more time thinking about how bad it was going to be and how I was going to do it, than it took to do it. Maybe I did luck out. Look at it this way. It's no time to solder two wires together. It's no time to remove the ashpan and make the hook. And none of this will cost you much of anything nor is this something you can't give up on. So if you want the voltage controlled functions, do the prep work and give yourself ten minutes to fish the wire through. If you are as lucky as I was, you will be done in three.
Since the locomotive has a flickering firebox effect, you certainly don't need to use those with the Sierra unless you want to. So you do not need to hook up those shown above. The Sierra does use these lights so that you can program it. So if you did not, or could not as frequently the case, mount your Sierra in such a way to see the LED's built onto it, you will need to add lights and the remote programming switches shown as well. Hide them under a coal load, or inside a tool box on the tender or locomotive as appropriate. On this locomotive, I put them in the tool boxes. It was mighty nice of Bachmann to provide these with working lids! Instead of light bulbs as shown, you can also use LED's and 470 ohm, 1/2 watt resistors. LED's theoretically, almost never burn out. If you do this, make sure you get the polarity of the LED's right. If you get it wrong, they simply don't work. Also, instead of a switch to control the Sierra, I go for a cheap, no-moving-parts solution that I developed for another locomotive that called for something that was more compact than any switch. Since it has no moving parts, there is nothing to ever go wrong, so I stuck with it for the ultimate in reliability. Instead of a switch, just use a header or a male minature Molex connector with the pins sticking up. You can cut the pins short if you need to in general. For this installation inside a tool box, you won't have to. Solder three wires to the pins using the center pin and wire as a common. Glue this into the tool box. To use, just short the middle pin to either of the other two pins with a small screwdriver or pliers. Use stick on numbers so that you know which pin and light or LED is which. The LED's on the Sierra are called 1 and 2. The buttons are labeled + and -. Since stickers for + and - are not readily available, label the pins 1 and 2 as well. This actually works out better! I can never remember whether it is + or - that puts the Sierra in programming mode. But I do remember that LED #1, indicates which feature is being programmed. So I label the pin that causes LED #1 to flash, 1. Some things are just too simple!
Components C3: Electrolytic capacitor, 100uF or more rated at 50V or more. C4, C5: 0.01uF, 50V ceramic capacitors. 7812: 7812 12, 1A voltage regulator. If possible, mount to metal inside your locomotive. However, it must be electrically isolated any other electrical device also using it for cooling. Otherwise, you will let the smoke out of something and ruin it, as well as your day. Z1: Any bridge rectifier good for at least 1A and 50V. R4, R5 should be 22 ohm, 1/4W resistors. R1,R3: Already present. See the section on Getting Electronic Parts.
Got a Screw Loose? I didn't have this problem, but I understand that some of the screws on the third driver, housing the actual drive from the motor, have or can come loose. This strips the gears. Since I don't seem to have this problem, maybe it's a problem Bachmann has solved. Still, it's worth checking occassionally. Murphy happens despite the best engineering!
Enjoy your new external frame locomotive - the ultimate in narrow gauge model railroading!
Free counters provided by Andale. |
Copyright by Allan Gartner 1996 - 2006 © All rights reserved. You may print this for your own, personal, non-commercial use. Non-commercial, non-personal reproduction may be requested by visiting www.WiringForDCC.com/writeme.htm . All users, commercial and non-commercial, may link only to this site at www.WiringForDCC.com. Thanks to all who contribute to this site and the Q&A forum! |