|
||||
into an Atlas RS-3 or Similar by John V. Baum J V Baum@aol.com This decoder is designed to fit into this locomotive. 1. Remove the grab irons and shell from the locomotive. Do not remove the plastic walkway from the locomotive. It's tough to reinstall after you've completed your wiring. Do not discard the factory installed weights or lightbars. The weights will be reinstalled. The lightbars can be used for forward and reverse lighting as described below. 2. Remove the front and rear truck leads, and snip the metal clips from those leads as closely as possible to the ends of each wire. 3. Remove the annealed copper wire from the left and right sides of the plastic circuit board. The removal of that wire will free the brush leads and factory installed light bulb. 4. Remove the plastic circuit board, and bend the copper strips from the brushes for the electric motor outward and away from the motor.
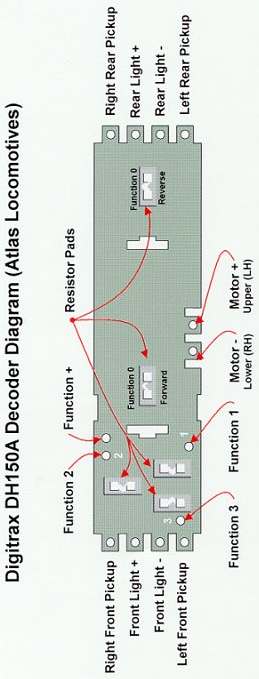
5. Refer to the diagram. Snap the Digitrax decoder board in place over the electric motor. The board must be installed with its components facing down. The front edge of the board should face the front of the locomotive. 6. Clip the copper brush strips to a length which will prevent their making contact with the decoder board and bend than back toward the motor. Solder short lengths of wire from the brushes to the decoder board as illustrated on the diagram. 7. Solder the truck leads to the decoder board as illustrated on the diagram. 8. The board will permit the installation of forward and reverse lighting, as well as three special effects. The leads for the front light bulb are soldered to the tabs on the front of the board between the truck leads, and the leads for the rear light bulb are attached to the same tabs on the rear of the board. 9. One lead for each special effect bulb is soldered to the appropriate location for its function as shown on the diagram. The other lead(s) are attached to the common (Function +) location as shown on the diagram. If you are using an LED or other polarity sensitive device for a special effect, the positive lead from the LED or that device is attached to the "Function +" location on the decoder board. 10. If you desire to use the existing light bars for forward and reverse lighting, shorten the ends of each bar by cutting approximately 3/4" of material from the end of the light bar facing the center of the locomotive. Carefully notch the shortened end to a width which will permit that notch to surround the light bulb. Notching will permit the light bar to absorb and transmit light to the lenses on the non-shortened end. Insert the bulb in the notch. Secure the bulb within the notch, and the light bar to the roof of the loco, with clear tape. 11. Axial Resistors for one or more light bulbs may be installed in the usual manner. Size 1206 surface mount resistors may be used in lieu of axial resistors, and are soldered to the resistor pads for forward, reverse, or special effect lighting shown on the diagram. Surface mount resistors may be obtained from Digikey (Telephone 1-800-Digikey; Website www.digikey.com) and from some Radio Shack outlets. [See the Getting Electronic Parts section for a little more about Digikey.-Allan] 12. If you elect to use surface mount resistors, be sure to remove the metal chevron between the two pads. If the chevron is not removed, current will bypass the resistor and may burn out your bulb. 13. Digitrax recommends 680 ohm resistors for LED's, 560 ohm resistors for 1.5 volt grain of rice bulbs, and 250 ohm resistors for 1.5 volt grain of wheat bulbs. You may need to either increase or reduce resistor values from those which are recommended. 14. Re-assemble the locomotive. The decoder board does not occupy space needed by the factory installed lead weights and clear plastic light bars, and they may be left in place if you so desire. |
Copyright by Allan Gartner 1996 - 2006 © All rights reserved. You may print this for your own, personal, non-commercial use. Non-commercial, non-personal reproduction may be requested by visiting www.WiringForDCC.com/writeme.htm . All users, commercial and non-commercial, may link only to this site at www.WiringForDCC.com. Thanks to all who contribute to this site and the Q&A forum! |