|
||||
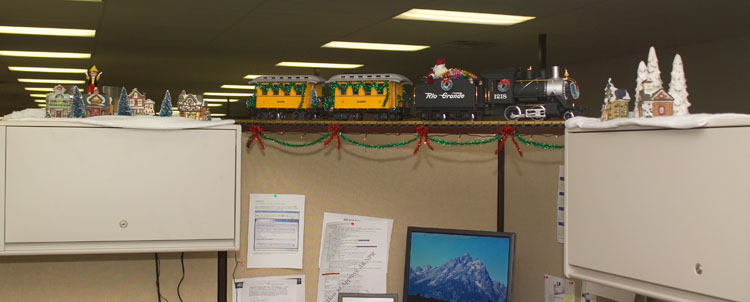
The G-scale cubicle train required more thought than the HO version. But once everything was figured out, it was just as easy to implement.
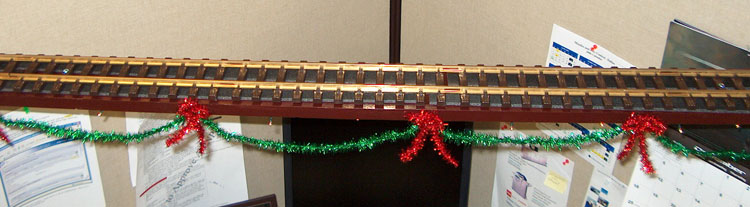
Between the track and the 1x4 "bridge" are a couple of pieces of Woodland Scenic N-scale foam roadbed to dampen vibration and quiet the train. I had a lot of decisions to make when I contemplated G-Scale. The first thing I thought about was whether I should go up and over my humble entrance. LGB sells a rack locomotive. That darn thing is about $500! But there were other problems. There really wasn’t a practical way to go from level to 45 degrees. Furthermore, my entrance is close to a corner. How would I do the rack on a curve? So the first decision is made: the G-Scale will be a back and forth layout just like the HO.
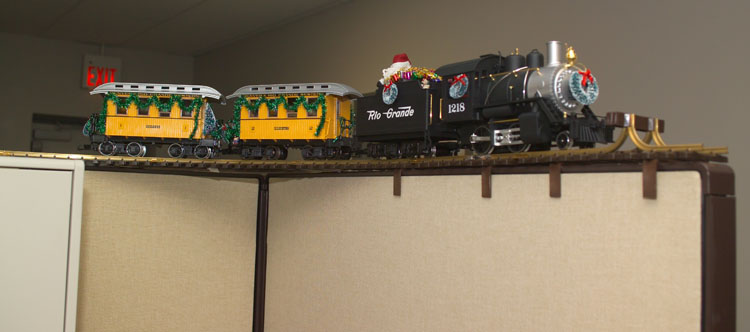
The minimalist approach in action. The track is supported by the most inconspicuous method I could think up.
What train was I going to use? I wanted a steam train and needed curved track, transformer, and throttle. The LGB starter sets are a good value. You can buy a starter set for under $300 - which isn't much more than the 2-4-0 locomotive alone. Other good choices is a a railcar, Galloping Goose, trolley, or the Lehman toy line ICE train (which is very inexpensive by-the-way). One thing you will need to do is take the weights out of your locomotive and tender. There are several reasons for this. One, should the train fall, it may survive better if it is lighter. Two, you won't break any toes. Third, removing the weights will reduce the need for a heavy duty bridge in the corners. Besides, to just pull a couple of cars, you don't need the weight. The Support Brackets: The support brackets are easily made out of 3/4" wide, 1/8" thick aluminum. You can obtain this at a home improvement store like Lowes. All you need is a vise and a inexpensive rubber mallet.
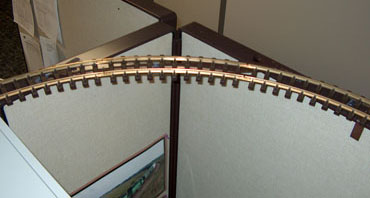
I have polled some friends and everyone's cubicle walls are a different thickness. This bracket consists of two sides that are 1-7/8" long and 2-1/4" wide. So in my case, I cut pieces of metal that were 1-7/8 + 2-1/4 + 1-7/8 = 6" long. Note: If there is enough interest, I may offer brackets for sale. Just put the piece of metal in the vise and bend it over with the rubber mallet. Don't be sloppy. Make sure the mark on your metal piece is aligned with the top of the vise. After bending the first side, put the second mark 2-1/4 (your wall thickness) on the metal. Flip it over in the vise and then bend the second side. Keep one of your brackets as a check and compare your other brackets against it. Make sure you are being careful enough in making them all the same. All of this is not difficult. It only takes a few seconds to bend over the bracket. I drilled a 1/8" hole through the middle of the bracket. I then drilled a countersink hole so that I could attach the track with #6 x 3/4" flat-head machine screws. This will allow the bracket to sit flat on top of the cubicle wall. By-the-way: If you have rounded top cubicle walls, I do not recommend installing a cubicle train using these brackets. You will need to think of something else. Finally, I painted the brackets with enamel paint. How many brackets do you need? The table below will allow you to figure out how many brackets you will need. I'll call the basic LGB 11000 piece of straight track a "1 ft" section - close enough! The table below should be pretty much self-explanatory. The curves however, need a little bit of explanation. It takes three curve sections to make a 1/4 circle. The curve sections are supported by other pieces of metal besides the above brackets. Only 1 bracket is needed at each end of a 1/4 circle. If you look at the above curve, you will notice that it is not supported by brackets.
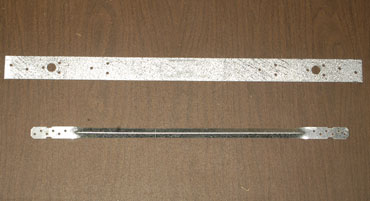
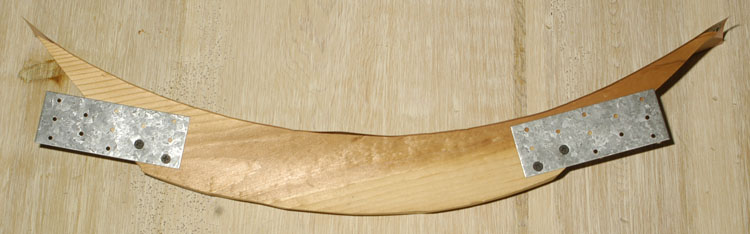
Most of the brackets I screwed through the holes in the ties. However, on the curves you will need to drill new holes. The existing holes are too far into the curve and won't mount right on your cubicle wall. Drill new holes the second tie in from the end. One more thing, my brackets are not evenly spaced. If anyone has noticed, no one has said anything. This is because of the location of the existing holes. If you are a neatness freak, you may want to drill new holes. On the 4' section, you would also need to use 4 brackets instead of three just to make everything look uniform. Supporting the corners. The above pieces of metal are galvanized steel that you get in the lumber area of your local home improvement store. The flat strap above comes in several sizes. The ideal one to get is 22" long and comes from Lowes. All you have to do is cut the ends off at a 45 degree angle, paint, and install under the curve. These pieces of galvanized steel are pretty stout. I use two of them per curve. There is no deflection of the bridge as the train passes over it. Don't forget to remove the weights from your engine. From the photo on the right, you can see that I am very successive with the minimalist approach - the "bridge" is virtually invisible. The 22" long strap fits perfectly under the curve and is supported by the cubicle walls. The lower metal strap in the above photo can be used with one flat strap to support a bridge. I can't find these anymore. Fortunately, two flat straps works just fine. The wooden bridge.
The wooden bridge over my work station is simply a 1x4 hanging between two cabinets. So that the piece of wood would be flush with the tops of the cabinets and cubicle walls, I screwed two nail plates to each end of the piece of wood. The nail plates hangs on top of the cabinets. I used the same technique to make my HO bridges. As I feared, the piece of wood acted like a sounding board and was a little loud. I cured that by placing some pieces of N-scale Woodland Scenics foam sub roadbed under the track. If you look closely at the above photo, you can see the black under the ties. This worked perfectly and reduced the train's volume to the same as it was running everywhere else.
Here is one of the HO bridges showing the nail plates. The G-scale bridge was done the same way. Wiring it up.
The above drawing shows the track running out on my front cubicle wall. One of the things I hoped the bigger flanges of G-scale would provide was resistance from being knocked over by people who like to lean on cubicle walls. So far, I've had no close calls with the train being knocked off. My plan appears to be working. You will need to gap the track at two locations. On the section where the locomotive is going forward, you gap behind the rear driver wheel. On the section where the locomotive is backing up, you gap behind the front driver - which includes the length of the whole train. Set these diodes up for the longest train you intend to run. I used 3A diodes, Radio Shack 276-1141, but you can probably use 1A 1N4001 diodes, Radio Shack 276-1101, just as well given how slow you will be running and the light load of your train. If you have any doubts about your ability to get the diodes in the right orientation, just try your train without the diodes. After you run the train into the isolation block, reverse the track power. Bridge the gap in the track with a diode. If your train backs up, you have it right. Solder the diode on. If the train doesn't back up, you have the diode wrong. My diagram above also shows how to wire in my timer circuit. If you buy the LGB or Aristocraft circuit, follow their directions. I put the timer and everything in one of my overhead cabinets. They are open in the back so running wires and a power cord in and out is easy. Putting it all together. I suppose if you measure everything perfectly and then cut everything perfectly, you can show up with everything in hand and install it. While I measured everything and drew it on my computer, I still took an incremental approach in case I made any measuring mistakes. Besides, I could only carry in so much at a time. I would bring stuff in, measure and mark it, carry it home, and then bring the cut pieces back the next day. This turned out to be more fun anyway. Everyday I'd bring in a little more. People were curious as the installation progressed and the anticipation grew. When would the big day be when the train would finally run? So I recommend taking your time and not rushing anything. If you cut a piece of track too short, you wasted $4. You'll have fun as the anticipation grows. By the way, LGB sells many short pieces of track. I had planned on using them until I saw that they all cost more than the standard 11000 piece of track. So I just used a 11000 section and cut it to length. In two cases, I managed to get two usable pieces of track out of one 11000 section. Running smoothly. I work with a bunch of engineers that need to concentrate. So I had to promise my cubicle neighbors that the train would be quiet. For starters, I run the train fairly slowly. My throttle setting is 2-1/4 on a scale of 4. Given how short the overall run from end-to-end is, you really don't want to go much faster. To further quiet things, I removed the power pick-up shoes. My train would depend on power pick up through the wheels. So you need to clean the track weekly. When I gapped my track for the diodes, I used a thick piece of styrene to fill the gap. It turned out this would lift the driver slightly and interfere with electrical contact. So make very sure that the top of the plastic is well below the top of the rail. I found the locomotive would squeak, so I used a plastic grease on the insides edges of the wheels where they touch the housing. Enjoy!
Free counters provided by Andale. |
Copyright by Allan Gartner 2007 © All rights reserved. You may print this for your own, personal, non-commercial use. Non-commercial, non-personal reproduction may be requested by visiting www.WiringForDCC.com/writeme.htm . All users, commercial and non-commercial, may link only to this site at www.WiringForDCC.com. Thanks to all who contribute to this site and the Q&A forum! |