|
||||
DCC Decoder Installation into an Aristo Craft "Gauge 1"
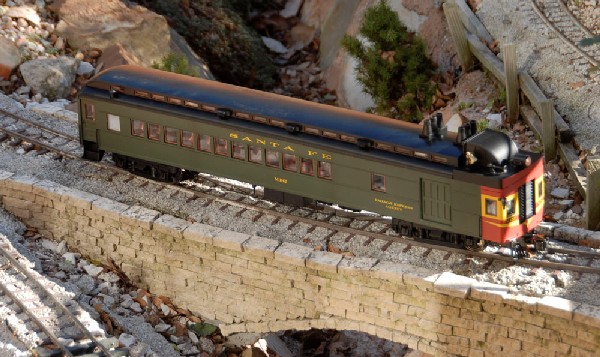
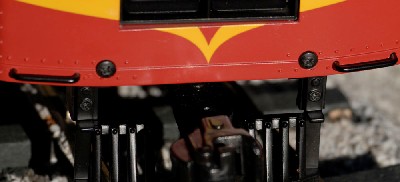
Decoder installation is about as simple as it gets in Aristo Craft's Doodlebug Gas Electric Railcar. Aristo Craft points out that this is a railcar and not a locomotive. Since it is not a locomotive, it has a small motor and per Aristo Craft's recommendation, it should only be used to pull a maximum of two cars. The Doodlebug appears to be heavy enough to pull the one car that I received with it. It has a little trouble with my 3.2% grades, but it does go up it. More weight might be necessary for two cars, but I would worry about damaging the motor on these grades with two cars. Because the motor is not big, I used a 2 amp HO decoder. That might save you a little bit of money. This is a nicely detailed product. It has interior LED lighting, a working headlight, and marker lamps. You could control all of these through DCC for much more work than I am proposing. I have chosen not to control any of these things and just let them operate all the time. I am only controlling the motor. This makes for a very simple installation. Like what seems typical of G-scale trains, figuring out how to get inside was a little challenging. But once you know how, it was easy to do. All you have to do is remove 4 screws and you are in. The sides of the railcar are attached to the chassis. The roof appears to come off, but I was never successful in fully getting it off. No matter, to install a decoder, you will want to go through the front.
Getting Inside
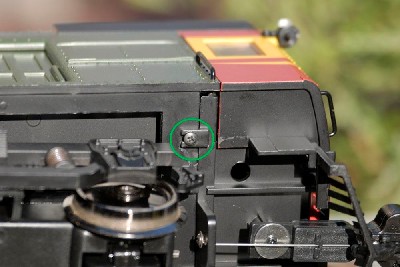
Follow this closely. Pull down on the front of the railcar. Don't pull down more than about a half an inch. There are wires attached to it so be careful. Then hinge the front from the bottom up. Leave the wires attached and move the front out of the way. You will now be faced with a divider wall inside the railcar. The second two screws you removed allow this to slide down. You will have a little trouble sliding it down. Aristo Craft taped some wires to it inside the railcar. Have a little faith and gently force it down. The tape will give way and the divider will slide down. Alternately, you can remove the roof (if you can figure out how) and remove the tape.
Wiring the Decoder
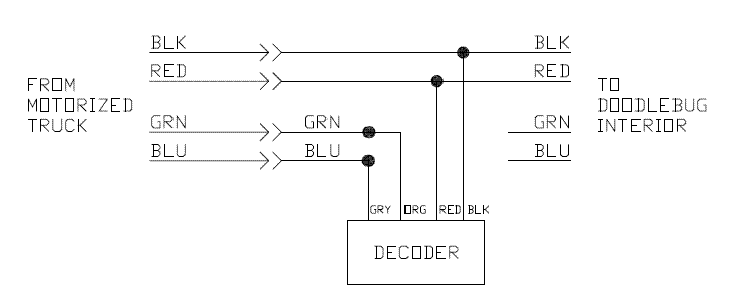
Once inside, you will find two connectors going to the motorized truck. The green and blue wires go to the motor. The red and black wire go to the wheels for power pick up. You will be cutting the wires on the Doodlebug side of the connectors. Leave the connectors attached to the motorized truck. Cut the blue and green wires. The ends going to the Doodlebug you will leave unattached. Put some heat shrink tubing over the unattached ends to make sure they don't short to anything. Connect the blue wire from the connector to the gray decoder wire and connect the green connector wire to the orange decoder wire. If you have not programmed your decoder, follow the instructions in this paragraph. If you have programmed your decoder, skip to the next paragraph. I programmed my decoder be temporarily connect the red and black decoder wires to the red and black wires going to the motorized truck. Leave the red and black going to the Doodlebug unattached. Put some electrical tape on everything so that nothing shorts out. Now program your decoder. Once programmed, splice the red and black decoder wires into the red and black wires from the connector and the inside of the Doodlebug. Put heat shrink on all exposed ends. That's it! Put the sliding panel and the hinged front back in by exactly reversing the instructions for removing the front. That means you will need to put the sliding panel most of the way back in, hinge the front, and then push everything down. Put all your screws back in. Now is a good time to put the under carriage bracing on. Enjoy! |
Copyright by Allan Gartner 1996 - 2009 © All rights reserved. You may print this for your own, personal, non-commercial use. Noncommercial, non-personal reproduction may be requested by visiting www.WiringForDCC.com/writeme.htm . All users, commercial and non-commercial, may link only to this site at www.WiringForDCC.com. Thanks to all who contribute to this site and the Q&A forum! |